Using an Online Keyboard Tester to Fix Your Keys
Is your spacebar sticking? Is the E key only registering when you mash it? Does Shift sometimes refuse to work in the middle of a sentence? Before you throw your keyboard in the trash, walk through this guide. Most "broken" keys on most keyboards are fixable in 15 to 30 minutes once you know what's actually going wrong, and the diagnostic step costs nothing. We'll use an online keyboard tester to pinpoint the exact symptom, then work through fixes from least invasive (software, free, 5 minutes) to most involved (switch replacement, $1 to $4 in parts, 30 minutes), so you stop at the first one that solves your problem.
Diagnostic Step 1: The Online Check
The first step is verification. A surprising fraction of "broken keys" are software issues, not hardware: a stuck modifier, a remap from gaming software, a corrupted driver, or an OS-level accessibility setting like Sticky Keys turned on by accident. Before you reach for a screwdriver, confirm what's actually happening.
Go to our Home Page and press the problematic key several times.
- Does it light up green immediately? If yes, the switch is sending a signal. The hardware is fine. The issue is in your OS, drivers, or a specific app's keybindings.
- Does it flicker or register doubles? This is chattering, a switch that bounces and registers extra presses. See our double typing fix for the specifics.
- Does it register sometimes but not always? Intermittent contact, usually from debris, residue, or a partially failed switch.
- No light at all, no matter how hard you press? Either a dead switch, a broken trace on the PCB, or (rarely) a controller-level fault.
Understanding the Mechanism
Modern keyboards fall into three categories, and the failure modes differ for each.
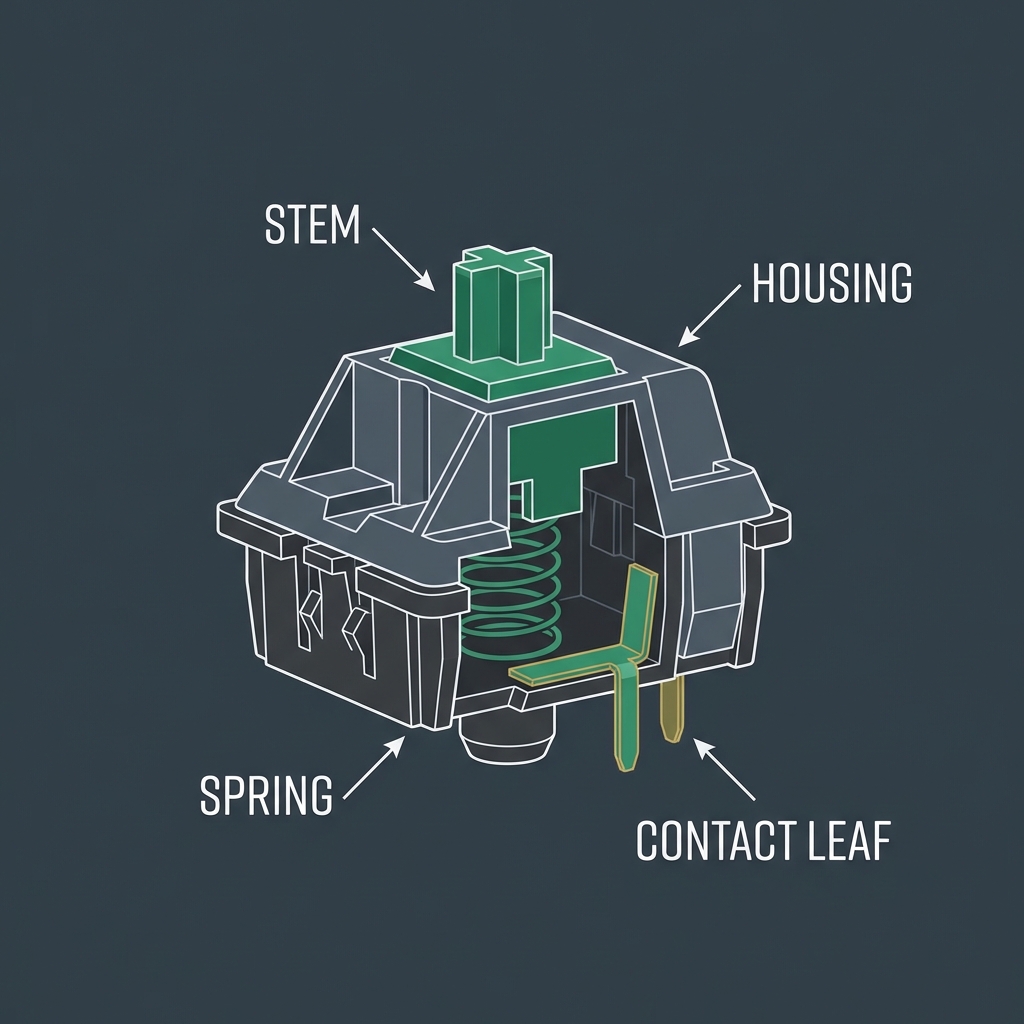
- Mechanical: Physical switch with a stem, spring, and metal contact leaves. Failures: debris under stem, dirty leaves, oxidized contacts, broken springs. Repairable at switch level.
- Membrane (rubber dome): A rubber dome over a printed conductive sheet. Failures: cracked dome, dust under membrane, worn contact pads. Generally not repairable per key.
- Scissor switch (laptops, slim keyboards): A scissor mechanism over a rubber dome. Failures: similar to membrane plus broken scissor clips. Repairable in theory but delicate.
Common Fixes, Sorted by Effort
Start at the top of the list and work down. Stop at the first fix that resolves the symptom on the keyboard tester.
1. The Software Reset (5 minutes, free)
If the keyboard tester shows the key working but your computer ignores it, the problem is software, not hardware. Try this in order:
- Reboot the computer. Half of all "stuck modifier" issues clear with a single restart.
- Check for stuck accessibility settings on Windows: Settings > Accessibility > Keyboard. Toggle off Sticky Keys, Filter Keys, and Toggle Keys.
- On macOS: System Settings > Accessibility > Keyboard. Same toggles.
- Close keyboard customization software (Razer Synapse, Corsair iCUE, SteelSeries GG, Logitech G HUB, VIA, QMK Toolbox). A corrupted profile in any of these can suppress or remap keys.
- Reinstall the keyboard driver: Open Device Manager (Windows) > Keyboards > right-click your device > Uninstall device. Restart. Windows reinstalls a clean HID driver automatically.
- Test in a different application. If the key works in Notepad but not in your game or document editor, the binding is app-specific, not a hardware fault.
2. The "Wiggle" Clean (10 minutes, free)
Debris often gets lodged under the stem. Even a single crumb can prevent full key travel.
- Unplug the keyboard (or power off and remove batteries on wireless).
- Turn it upside down over a trash bin and tap the back firmly several times. You'll be surprised what falls out.
- Use compressed air or an electric duster to blast the affected switch while pressing it down repeatedly. Aim from multiple angles, not just straight down.
- Plug in and retest in the keyboard tester. If the key now registers, you're done.
3. The Keycap Pull and Swab (20 minutes, ~$5)
If dusting alone didn't help and the key still fails, the switch contacts likely need direct attention.
- Use a keycap puller. Wire pullers are gentler than ring pullers; ring pullers are gentler than prying with a butter knife. Never use a butter knife.
- Pull the keycap straight up with even pressure. For long keys (spacebar, shift, enter), grip both ends and lift simultaneously to avoid stressing the stabilizer.
- Inspect the switch. Look for visible debris, hair, or sticky residue.
- Dip a cotton swab in 70% to 91% isopropyl alcohol so it's damp but not dripping.
- Swab around the visible portion of the switch stem and housing.
- For stubborn intermittent contact, use a 1-second burst of electrical contact cleaner straight into the switch stem opening. Do NOT use WD-40, water, or household cleaners.
- Press the bare switch stem 20 to 30 times to work the cleaner through the contacts.
- Wait 10 to 15 minutes for everything to evaporate.
- Reinstall the keycap by pressing straight down. Test in the keyboard tester.
4. The Stabilizer Reseat (15 minutes, free)
For long keys (spacebar, shift, enter, backspace, number-pad zero), the issue is often a popped stabilizer wire rather than a switch fault. The keycap moves but the switch never actuates because one side isn't transmitting force properly.
- Remove the long keycap with a wire puller, gripping both ends evenly.
- Look at the stabilizer: a metal wire bent into a U shape, sitting in plastic housings on either side of the central switch.
- If one end of the wire is hanging loose or popped out of its clip, press it back into the housing until it clicks.
- Reinstall the keycap by pressing straight down on all three contact points (center switch, left stab, right stab) until each clicks home.
- Test in the keyboard tester. For spacebar specifically, see our dedicated spacebar fix guide.
5. Switch Replacement (Permanent Fix)
If cleaning didn't help and the switch is failing electrically, replacement is the definitive fix. Replacement difficulty depends entirely on whether your keyboard is hot-swap or soldered.
- Hot-swap mechanical: 5 minutes of work. Pull the switch with a switch puller, push in a new switch, replace the keycap. Replacement switches cost $0.30 to $1.50 each. Most Keychron, Glorious, recent Keebnews, and many enthusiast boards are hot-swap.
- Soldered mechanical: 30 minutes plus tools. You'll need a soldering iron, desoldering pump or solder wick, and patience. If you've never soldered, watch a video first or take it to a repair shop ($5 to $15 for a single switch swap).
- Membrane keyboard: Individual switches aren't replaceable. If the membrane sheet or rubber dome is damaged, full keyboard replacement is the only path. See our replacement guide.
- Laptop keyboard: Replacement keycap kits exist for many ThinkPad, MacBook, and Dell models for $5 to $20. The clip mechanism is delicate. If the underlying membrane is the failure, full keyboard replacement requires partial laptop disassembly.
Mechanical vs. Membrane vs. Laptop Limits
- Mechanical: Most repairable. Almost any single-key issue fixable at switch level.
- Membrane: Binary. Cleaning works or it doesn't; if not, the whole board is the unit of replacement.
- Laptop: Single popped keycap usually replaceable; multiple dead keys often mean full top-case replacement.
Common Mistakes (What NOT To Do)
- Don't pry off keycaps with a butter knife or screwdriver. A $5 keycap puller pays for itself instantly.
- Don't use WD-40 inside a switch. It's a solvent, not a lubricant; it destroys contact leaves.
- Don't reinstall keycaps while wet. Trapped moisture corrodes contacts for weeks.
- Don't yank long keys from one end. Lift both ends simultaneously or the stabilizer pops out.
- Don't solder if you've never soldered. A repair shop charges $5 to $15 to swap a single switch.
- Don't ignore the software steps. Always test in the keyboard tester first to rule out remaps and stuck modifiers.
When to Stop Repairing and Replace
If two or more keys are dead on a soldered membrane board, or if phantom inputs appear regardless of which keys you press, the controller or PCB is failing and repair stops being economical. Run our online keyboard tester end-to-end and count failures. One key fails: fix it. Three or more keys fail across different parts of the board: the math now favors replacement. See when to replace your keyboard for the full decision framework.
Did you spill liquid?
If your keys stopped working after a spill, STOP testing immediately. Read our Spill Rescue Guide to prevent permanent damage.
Key typing double characters?
If your key registers twice per press, that's chattering — not the same issue as a dead key. Read our Keyboard Double Typing Fix for software and hardware solutions.
Frequently Asked Questions
Why is one key on my keyboard not working?
In order of likelihood: debris under the keycap blocking the switch stem, dirty switch contacts, a software remap or stuck modifier, a popped stabilizer (long keys only), a fully failed switch, or a broken PCB trace. Use our online keyboard tester to confirm the symptom, then work through the fixes from least to most invasive.
How do I fix a stuck key without taking the keyboard apart?
Compressed air at multiple angles while pressing the stuck key repeatedly clears most stuck-key complaints. If air alone doesn't help, the keycap usually has to come off for a swab and contact-cleaner pass. That's a 20-minute job at most.
Can I fix a laptop key that popped off?
Often yes, if the scissor clip is intact. Align the cap over the clip, press down at the corners until you feel each side snap in. If the clip itself broke or came off with the cap, you'll need a replacement keycap kit specific to your laptop model. Many manufacturers sell these for $5 to $20.
My key works in Notepad but not in my game. What's wrong?
The hardware is fine; the issue is in-app. Open the game's keybinding settings and look for that key. Many games default-bind keys you don't expect, and gaming keyboard software can layer additional remaps on top. Reset the game's bindings to default, and close any keyboard customization software while you test.
How do I tell if a key is hardware or software broken?
Open our online keyboard tester and press the key. If it lights up green there but doesn't type in your apps, it's software. If it doesn't even light up in the tester, it's hardware. This single check saves hours of guessing.