Clean Your Board to Pass the Online Keyboard Tester
Is your keyboard failing the test? Sticky keys, double-typing (chattering), and unresponsive switches are usually caused by years of snack crumbs, dust, skin oil, and residue from drinks. The good news is that 80% of keyboard problems people blame on "wear" are actually solvable in 30 minutes with basic supplies. This guide covers everything from a quick weekly dusting to a deep clean that takes failed keys back to green on the online keyboard tester.
Why Keyboards Get Filthy Faster Than You Think
A keyboard sits directly under hands that touch food, faces, and phones all day. Beyond hygiene, the accumulation directly affects keystroke reliability: skin oil works down switch stems and dries into a sticky film, dust packs around contact leaves, and crumbs wedge under keycaps and prevent full key travel. The result on the tester is exactly what you'd expect: keys that register intermittently, feel mushy, or stop responding entirely. A regular cleaning routine prevents most of these failures before they start.
What You Need
Essential
- Microfiber Cloth
- Compressed Air (Canned or Electric)
- Cotton Swabs
- Isopropyl Alcohol (70%+)
Pro Level
- Keycap Puller
- Switch Lube (Advanced)
- Small Brush
- Electrical Contact Cleaner (for switches)
- Soft toothbrush (for stabilizers and case)
A Cleaning Schedule That Actually Works
Most people clean their keyboard once when something stops working. A simple schedule prevents most failures entirely.
- Weekly (2 minutes): Unplug, flip upside down, tap the back firmly to dislodge crumbs, wipe the surface and keycap tops with a slightly damp microfiber cloth.
- Monthly (10 minutes): Compressed air across all switches at multiple angles, then a cotton swab with isopropyl alcohol around any keycap that feels grimy. Wipe the case sides and bottom.
- Quarterly (30 to 45 minutes): Full keycap removal, deep clean of caps in soapy water, dust the bare PCB and switches, light contact cleaning on any switch that's started feeling inconsistent.
- Annually or after a spill: Full disassembly if comfortable, switch lube if you're a hobbyist, replacement of any stabilizer pads or PCB foam that have compressed.
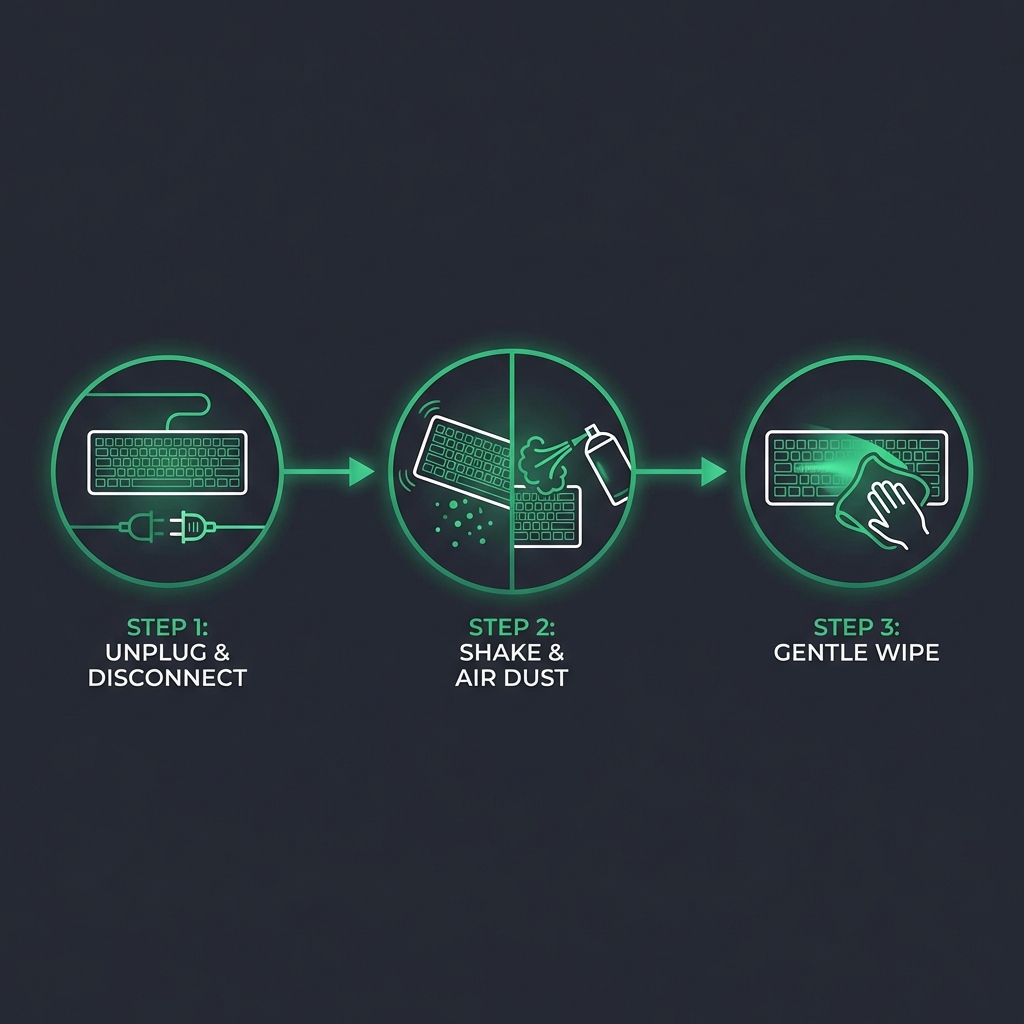
Step 1: The Shake Down
Crucial: Unplug your keyboard first (or power off and remove batteries on wireless). Turn it upside down over a trash bin or sink. Hold both ends and tap the back firmly several times. You will be horrified by what falls out. This alone fixes a surprising fraction of "crunchy" or intermittent keys, especially on laptops and on the spacebar, which catches more debris than any other key.
If the keyboard has a removable cable, unplug that too. Take a moment to inspect the cable jacket and connector for fraying or bent pins. A damaged cable can mimic switch failure on the tester, and replacing a $10 cable is much cheaper than replacing a keyboard.
Step 2: Deep Dusting
Using your air duster, spray at a 45-degree angle from multiple sides of the board so debris is pushed out rather than deeper into the switches. Keep canned air upright the whole time so the liquid propellant doesn't spray onto the PCB, where it can cause cold-shock damage and leave residue. Hold the nozzle at least 1 to 2 inches from the keys.
If you are serious about maintenance, invest in an Electric Duster. It pays for itself after about 3 cans of compressed air, has consistent pressure, never freezes the nozzle, and is safer for electronics because there's no propellant to worry about.
Pro Tip
After dusting, plug the keyboard back in and run our online keyboard tester. If keys that previously failed are now lighting up green, your problem was debris, not failure. Stop here and put the cleaning supplies away.
Step 3: Surface Wipe Down
Skin oil and grime build up on keycap tops faster than people realize. Dampen a microfiber cloth with isopropyl alcohol (70% to 91% concentration) and wipe each keycap top. The alcohol cuts oil quickly and evaporates without leaving residue. Avoid soaking the cloth; you want damp, not wet, so liquid never drips down between keys.
For the case sides and bottom, the same damp microfiber works well. A soft toothbrush helps with the seam where the keycap meets the case on heavily used boards.
Step 4: Sticky Key Surgery
If a specific key is failing the Online Keyboard Tester after dusting, the switch itself probably needs cleaning.
- Remove the keycap (use a wire or ring puller, not a butter knife or screwdriver, which scratch the keycap and stress the switch).
- Dip a cotton swab in isopropyl alcohol so it's damp but not dripping.
- Clean around the switch stem and the visible portion of the housing.
- For stubborn intermittent contact, use a short burst of electrical contact cleaner directly into the stem opening instead of alcohol.
- Press the stem down repeatedly (20 to 30 times) to work the cleaner through the contacts.
- Let it dry completely (10 to 15 minutes) before plugging in. Reinstall the keycap by pressing straight down on all sides until it clicks.
- Test the key on our online keyboard tester to confirm the fix.
Step 5: Quarterly Deep Clean (Keycap Bath)
Once every three months, give your keycaps a full bath. This is the difference between a board that looks new and one that develops a permanent grimy sheen.
- Photograph your layout before pulling caps off. This sounds obvious; it isn't, and nobody wants to remember whether the apostrophe goes left or right of L.
- Pull every keycap with a wire or ring puller. Pull straight up, with even force on both ends of long keys (spacebar, shift, enter) to avoid stressing stabilizers.
- Soak the caps in a bowl of warm water with a few drops of dish soap for 30 to 60 minutes. Don't use bleach or solvents that can fade legends.
- Agitate gently with a soft toothbrush to dislodge stuck-on grime, especially on keys you press most.
- Rinse thoroughly with clean water and lay caps out on a towel, legend-side up, to air-dry for at least 12 hours. Wet keycaps reinstalled on a board will deposit moisture into switches.
- Dust the bare PCB while you wait. With keycaps off, you can blow compressed air directly across the switch tops and around the stabilizers, where most of the debris hides.
- Reinstall caps by pressing straight down. For long keys with stabilizers, line up the stab posts with the cap holes before pressing.
- Run a full keyboard test on every key to verify nothing was dislodged during reinstall.
Mechanical vs. Membrane vs. Laptop: Different Rules
Cleaning approach varies by keyboard type. Treating a laptop keyboard like a mechanical one will damage it.
- Mechanical: All techniques above apply. Keycaps come off cleanly. The full deep clean is straightforward.
- Membrane desktop: Stick to dusting, surface wipes, and shake-out. Don't pull keycaps unless the manual permits it.
- Laptop (scissor/butterfly): Clip mechanism is fragile. Limit yourself to compressed air and a damp microfiber on the surface. Look up your model's keycap procedure before prying.
- Apple Magic Keyboard and similar low-profile boards: Sealed. Surface wipes only.
Common Mistakes (What NOT To Do)
- Don't dunk a keyboard in water. A persistent online myth says you can run a whole keyboard through the dishwasher. Some specific keyboards survive this; most don't. Membrane PCBs and modern mechanicals with foam dampening absolutely do not.
- Don't use Windex, 409, or household cleaners. They contain ammonia and surfactants that fade keycap legends and corrode switch contacts.
- Don't use a vacuum cleaner. Vacuums generate static that can damage the PCB controller, and they pull off keycaps unpredictably. Compressed air or an electric duster pushes debris out without these risks.
- Don't skip drying time. Reinstalling damp keycaps causes immediate stickiness and long-term corrosion under the cap.
- Don't lubricate switches if you don't know what you're doing. Switch lube belongs inside the switch, applied to specific surfaces with a thin brush. Spraying WD-40 or any aerosol lubricant into the switch will destroy it.
- Don't reuse a dirty cotton swab. The whole point is removing debris; a saturated swab just spreads it around. Use a fresh swab per cluster of keys.
Warning
Never use water or household cleaners like Windex. They can cause short circuits and corrosion. Stick to isopropyl alcohol and electrical contact cleaner for anything near the switch contacts.
When Cleaning Doesn't Fix It
Cleaning rescues most "failed" keyboards, but not all. If a specific key still fails the tester after dusting, swabbing, and contact cleaner, the switch itself has electrical failure. On a hot-swap mechanical board, replace the switch (5 minutes, $1 to $4 in parts). On a soldered board, you'll need a soldering iron or a repair shop. On a membrane keyboard, individual switch repair generally isn't possible.
For details, see our guide to fixing broken keys, or read when it's time to replace your keyboard if you've reached the limit of what cleaning can do.
Frequently Asked Questions
How often should I clean my keyboard?
A quick surface wipe and shake weekly, a more thorough dust and wipe monthly, and a full deep clean with keycap removal every three months. Heavy users (8+ hours daily) and anyone who eats at their desk should clean more often.
Can I use isopropyl alcohol on keycaps?
Yes, on the surface and around the stem. Avoid soaking printed legends in alcohol for long periods; some pad-printed legends can fade. Double-shot and dye-sublimated keycaps are unaffected. Use 70% to 91% concentration; both work well.
Is it safe to put keycaps in the dishwasher?
Plastic keycaps tolerate it, but the high heat of a normal dishwasher cycle warps them and can fade legends. A warm soapy water bath in a bowl gives the same result with no risk. Never put the keyboard itself (with electronics) in any kind of water bath.
Why does my key still feel sticky after cleaning?
If the key feels physically sticky, residue is still inside the switch. Use electrical contact cleaner with a more aggressive flush (spray, actuate 30 times, dry, test). If the key registers fine on our online keyboard tester but still feels gummy, the spring or switch internals may have collected dust beyond what cleaning can fix.
My laptop key popped off during cleaning. Can I put it back?
If the scissor clip itself is intact and on the keyboard, press the cap back down at the corners until it snaps in. If the clip came off with the cap or broke, look up your specific model's keycap replacement kit from the manufacturer.